How to Record a Voice Over at Home
How to record a voiceover at home, which room to pick, microphone distance and pop filters, how to perform a script, and the mistakes that ruin a take.
How to record a usable voice over without a studio, which room to choose and why size matters, microphone distance and pop filters, how to perform a script rather than read it, and what ruins a take.
To record a voice over at home, choose a medium sized room with soft furnishings, position the microphone six to eight inches away behind a pop filter, monitor on headphones, and record in short sections with multiple takes. The room matters more than the microphone.
The useful question is not "which microphone should I buy?" It is "what is this room doing to my voice?" A modest microphone in a treated space beats an expensive one in a bare room, and that ordering surprises almost everyone the first time.
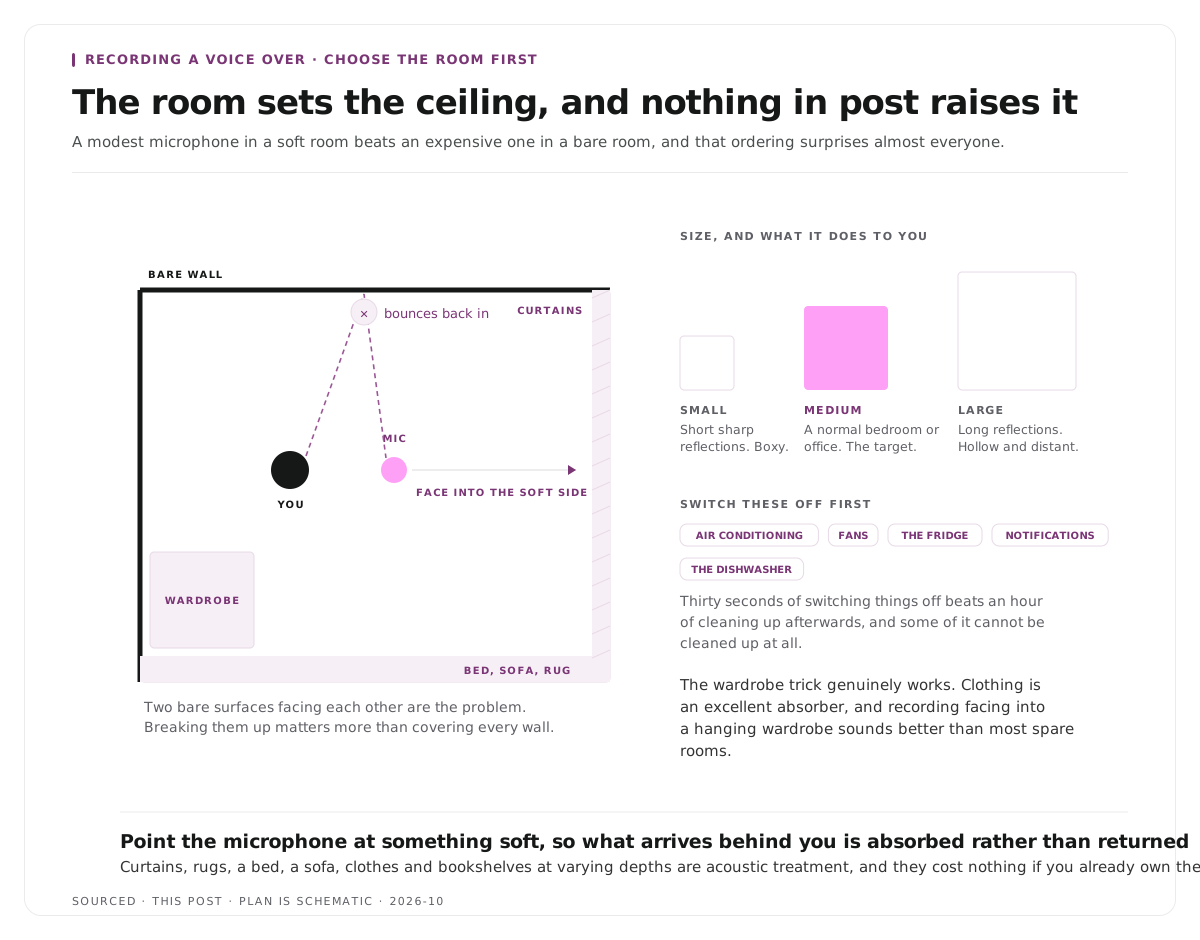
Choose the room before the microphone
The room decides the ceiling of what you can achieve, and nothing in post repairs it.
Medium sized is the target. Small rooms produce short sharp reflections that sound like boxiness. Large rooms produce long reflections that sound hollow and distant. A normal bedroom or office is usually about right, which is convenient.
Avoid parallel hard surfaces. Two bare walls facing each other, or a bare floor and ceiling, create standing reflections. Breaking them up matters more than covering every surface.
Soft things everywhere. Curtains, rugs, a bed, a sofa, clothes, bookshelves with books at varying depths. These are acoustic treatment, and they cost nothing if you already own them.
The wardrobe trick works. Recording inside or facing into a hanging wardrobe is genuinely effective, because clothing is an excellent absorber. It is not elegant and it sounds better than most spare rooms.
Face into the soft side. Point the microphone toward soft material rather than toward a bare wall, so the reflections arriving behind you are absorbed rather than bounced back.
Kill the noise sources. Air conditioning, fans, fridges, notifications, the dishwasher. Thirty seconds of switching things off beats an hour of cleaning up afterwards, and some of it cannot be cleaned up at all, as covered in how to remove background noise from audio.
The microphone setup
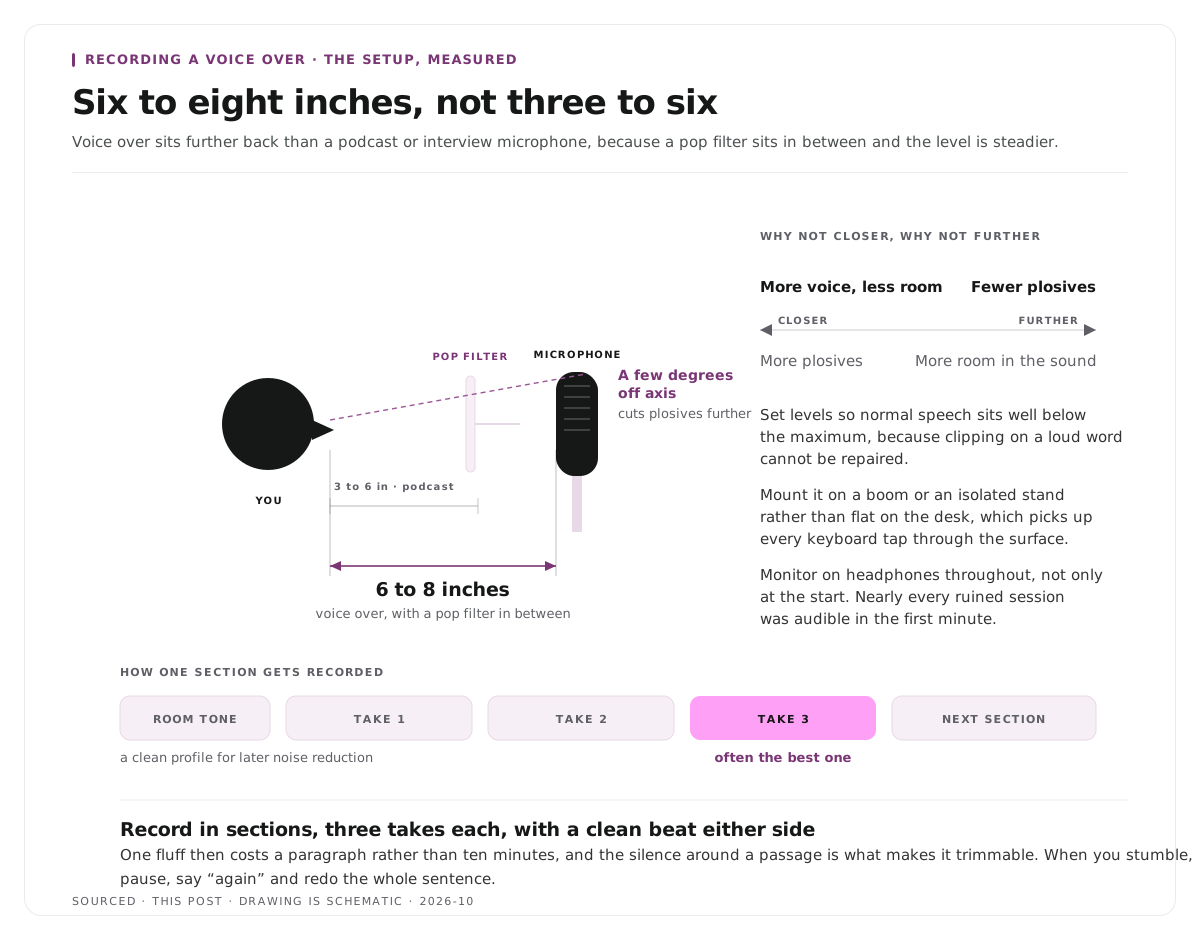
Distance: six to eight inches. This is further than the three to six inches usual for interview and podcast microphones, because a pop filter sits between you and the capsule and because voice over tends to be performed at a more consistent level.
Closer gives you more voice relative to room, which is good, and more plosives and mouth noise, which is not. Six to eight inches is the usual balance.
Use a pop filter. The circular screen that sits between you and the microphone. It exists to catch plosives, the blasts of air from p and b sounds that produce a thump no processing removes cleanly. A pop filter is one of the cheapest items in audio and one of the most consequential.
Speak slightly across the microphone rather than directly into it. Angling a few degrees off axis reduces plosives further.
Mount it on a boom arm or a stand with isolation. A microphone sitting on the desk picks up every keyboard tap and every knock through the surface.
Set levels so normal speech sits well below the maximum. Clipping on a loud word cannot be repaired, and leaving headroom costs nothing.
Monitor on headphones throughout. Not at the start, throughout. Nearly every ruined session was audible in the first minute and nobody was listening.
Prepare the script for speaking
A voice over script is a performance document, not prose.
Read it aloud before recording. Anything that makes you stumble gets rewritten in whatever words you instinctively used instead.
Short sentences. If a sentence needs a breath in the middle, split it.
Mark your breaths and pauses. Line breaks where you intend to pause, so the layout tells you how to perform it.
Mark emphasis. Underline or bold the words carrying weight. Without marking, delivery flattens across long passages.
Practise, but not to fluency. Enough that you are not discovering the material on the take. Not so much that it becomes recitation, which is audible immediately.
Break it into sections. Recording a long script in one pass means one mistake near the end costs you the whole take. Sections of a paragraph or two are far easier to work with and to re-record.
The broader technique for not sounding like you are reading applies here too, and it is covered in talking head videos.
Performing the take
Stand if you can. Breath support is better standing, and the voice carries more energy. A lot of professional voice work is recorded standing for this reason.
Warm up. Talk for a couple of minutes about anything before the first take. The voice at the top of a session is not the voice you want on the recording.
Stay hydrated, and avoid dairy immediately before. Mouth clicks and tongue noise increase when you are dry, and they are tedious to edit out one by one.
Record a few seconds of silence at the start. Room tone, which gives any later noise reduction a clean profile to work from.
Do multiple takes of each section. Three is a reasonable default. The second is usually better than the first and the third is often the best, and this is the single biggest quality lever available to an amateur.
Clap or say a marker before a retake. When you fluff a line, pause, say "again", and redo the whole sentence rather than picking up mid phrase. A clean restart edits invisibly and a mid phrase pickup rarely does.
Leave a beat either side of each section. Clean silence around a passage is what makes it trimmable.
Do not perform the punctuation. Reading with exaggerated rise and fall at every comma is the most common amateur tell. Speak it the way you would explain it.
Editing what you recorded
Choose takes before you process anything. Assemble the best version of each section first, then clean the assembled file once rather than processing takes you discard.
Breathing is normal. Removing every breath produces something unsettling and inhuman. Reduce the loudest ones rather than deleting all of them.
Trim the silences, do not remove them. Pauses carry meaning. Shorten the long ones rather than closing every gap.
Clean the audio before adding music. Noise reduction after music is mixed is far harder, since the processing cannot separate the two. The order of repairs is in how to edit a podcast, the audio and video workflow.
Export to a lossless format if the file is going into an edit. Compressing early then compressing again at delivery costs quality for no benefit.
Worked example: two home setups
This is an invented example, not measured data.
Two people record the same script at home on the same day.
The first buys a well reviewed microphone and records at a desk in a spare room with a bare floor, a bare wall behind the desk and an uncovered window. The microphone is excellent. The recording has a clear boxy quality on every word, and no processing removes it.
The second uses a cheap USB microphone, records standing in a bedroom facing an open wardrobe, with a duvet on the bed behind them and curtains drawn. The microphone is unremarkable. The recording is clean, close and usable.
The second person spent a fraction as much and got the better result, because the room was doing most of the work in both cases.
Where Montage fits
Montage does not record voice overs, has no recording features and no audio processing tools. Everything on this page happens before it is involved.
Where it applies is when a voice over accompanies long form video that will also produce clips. Upload the recording, up to 20GB at 4K, and it returns a timestamped transcript alongside 8 to 10 scored clip candidates, each trimmable by editing the transcript text, with branded captions and vertical reframing applied, exporting as MP4 for social or XML, FCPXML and JSON for an editor.
One detail connects directly to the multiple takes advice above. Because trimming happens on the transcript, keeping the third attempt at a line and discarding the first two is a text operation rather than hunting for edit points in a waveform, which is described in text based video editing. Recording loosely and selecting afterwards is a reasonable way to work.
To try it on one recording, use the podcast clip finder.
Limitations and troubleshooting
The recording sounds boxy or hollow. The room, not the microphone. Add soft material, face into it, and move away from bare parallel surfaces.
There are thumps on p and b sounds. Plosives. Use a pop filter and angle slightly off axis. They are very difficult to remove afterwards.
I can hear clicks and mouth noise. Dryness. Drink water, avoid dairy before a session, and take a short break. Editing them out individually is slow work.
The level jumps between takes. You moved relative to the microphone. Mark your position, and if standing, note where your feet are.
There is a hum throughout. Usually electrical interference or a nearby appliance. Try a different outlet, move the cable away from power leads, and switch off what you can.
My voice sounds thin compared with professional recordings. Partly processing and partly proximity. Getting slightly closer increases warmth, within the limits plosives allow.
One mistake ruined a long take. Record in sections. A paragraph at a time means a fluff costs a paragraph rather than ten minutes.
Frequently asked questions
How far should you be from the microphone for a voice over?
Six to eight inches, which is further than the three to six inches typical for podcast and interview microphones, because a pop filter sits in between and voice over is performed at a steadier level.
What is the best room for recording a voice over at home?
A medium sized room with soft furnishings and no large bare parallel surfaces. Small rooms sound boxy, large rooms sound hollow, and a bedroom with curtains, a bed and a wardrobe is usually close to ideal.
Do you need a pop filter for voice over?
Yes. Plosives from p and b sounds produce a low thump that no processing removes cleanly, and a pop filter is among the cheapest and most consequential items in a home setup.
Should you stand or sit to record a voice over?
Stand if you can. Breath support is better and the voice carries more energy, which is why a great deal of professional voice work is recorded standing.
How many takes should you record?
At least three per section. The second is usually better than the first and the third is often the best, and this is the largest quality improvement available without buying anything.
Should you remove all the breaths from a voice over?
No. Removing every breath produces an unnatural result. Reduce the loudest ones and leave the rest, since breathing is part of how speech reads as human.
Does Montage record or process voice overs?
No. Montage produces clips from finished recordings. Recording and audio processing happen elsewhere.