How to Improve Video Quality in Post (and What You Cannot Fix)
The order to fix video quality in post, why denoise comes before sharpen, what bitrate actually controls at export, and the problems that cannot be repaired.
The order to apply fixes when improving video quality after the shoot, why some steps must come before others, what export settings actually control, and which problems have no repair.
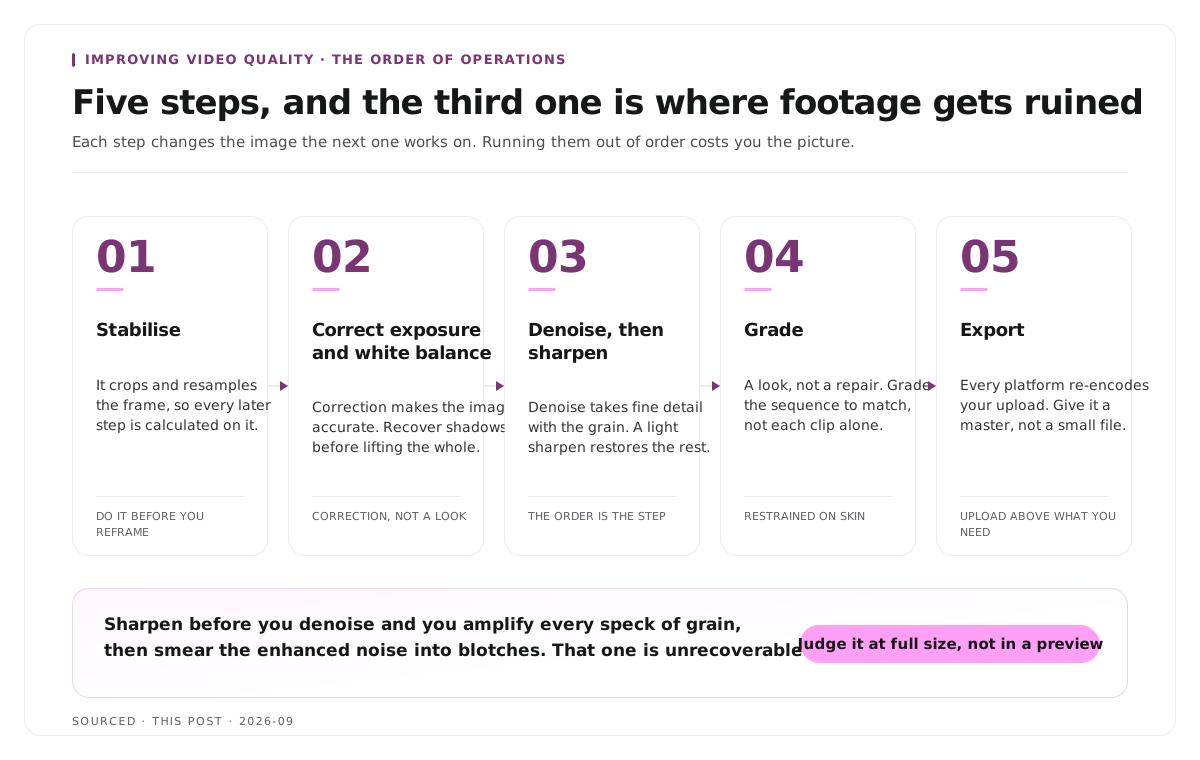
To improve video quality in post, work in this order: stabilise, correct exposure and white balance, reduce noise, then sharpen, then grade, then export at a high enough bitrate. The order matters more than the tools, because sharpening before denoising amplifies the noise you were about to remove.
The useful question is not "which enhancer should I use?" It is "which part of the image is actually broken?" Softness, noise, wrong colour and shake are four different faults with four different fixes, and applying the wrong one makes the picture worse while appearing to do something.
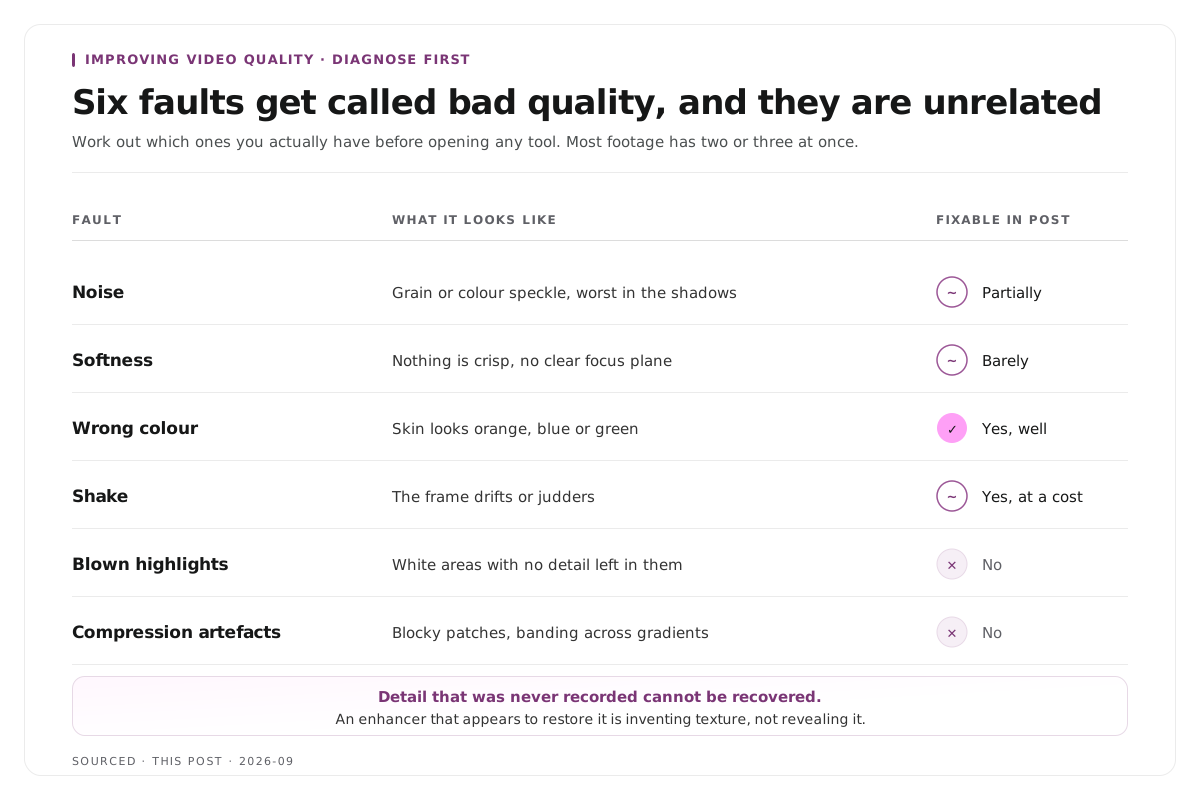
Diagnose before you touch anything
Four faults get called "bad quality" and they are unrelated.
| Fault | What It Looks Like | Fixable in Post? |
|---|---|---|
| Noise | Grain or colour speckle, worst in shadows | Yes, partially |
| Softness | Nothing is crisp, no clear focus plane | Barely |
| Wrong colour | Skin looks orange, blue or green | Yes, well |
| Shake | The frame drifts or judders | Yes, at a cost |
| Blown highlights | White areas with no detail | No |
| Compression artefacts | Blocky patches, banding in gradients | No |
The last two are the ones people waste the most time on. Detail that was never recorded cannot be recovered, and an enhancer that appears to restore it is inventing texture rather than revealing it.
Work out which of the six you actually have before opening any tool. Most footage has two or three at once, and they need fixing in a specific order.
Step 1: stabilise first
Do stabilisation before anything else, because it crops and resamples the frame, which changes every subsequent calculation.
Stabilisation works by moving and scaling the image to cancel out movement, which means it always crops in. A heavily shaken shot loses a noticeable amount of frame and gets softer as a result, so use the lowest setting that makes the shot watchable rather than the one that makes it perfectly still.
If you intend to crop to vertical later, stabilise before you reframe, not after. Doing both independently crops twice.
Step 2: fix exposure and white balance
Correction comes before grading, and they are different jobs. Correction makes the image accurate. Grading makes it look a particular way.
Set white balance on something neutral. A white wall, a grey surface, the whites of someone's eyes. Get the colour cast out before you judge anything else, because a warm cast makes an image look softer and noisier than it is.
Recover shadows before you lift the whole image. Raising overall brightness lifts noise along with the picture. Lifting only the shadow range does less damage.
Do not chase blown highlights. If a window is pure white, there is no data there. Pulling highlights down turns white into grey, which looks worse than the original.
Match every clip in the sequence at this stage, especially if some are from a different camera or a different day. Consistency across the timeline matters more than any single clip being perfect.
Step 3: denoise, then sharpen, in that order
This is the step people get wrong and it costs them the image.
Noise reduction and sharpening pull in opposite directions. Denoising smooths the image and takes fine detail with it. Sharpening increases local contrast at edges, and it cannot tell the difference between an edge and a grain of noise.
Sharpen first and you amplify every speck of noise, then denoise it and you smear the enhanced noise into blotches. The result looks worse than the untouched footage and is unrecoverable without starting over.
Denoise first and you remove the grain, then a light sharpen restores the perceived crispness of what remains.
Two rules for both.
Use less than you think. Over denoised footage looks like plastic, especially on skin. Over sharpened footage grows bright halos on every edge. Both read as amateur more loudly than the original fault did.
Judge at full size, not in a small preview window. A small preview hides both errors completely, which is why so much over processed footage gets exported.
Step 4: grade last
Grading is a look rather than a repair, and applying it before correction means you are grading a broken image.
Keep it restrained for talking head and interview work. Skin tone is the thing viewers judge, and a heavy stylised grade on a face reads as a mistake rather than a style. A gentle contrast curve and slightly desaturated shadows is enough for almost all of this type of content.
Grade the whole sequence to match, not each clip in isolation. If the clips are destined for social rather than a full edit, the caption and framing choices matter more than the grade does, and those are covered in caption styles for B2B and B2C platforms.
Step 5: export at a bitrate that survives the platform
The export is where a lot of carefully repaired footage gets undone.
Bitrate controls how much data describes the picture. A higher bitrate means more detail retained and a bigger file. Exporting a clean grade at a low bitrate reintroduces the blockiness you spent an hour removing.
Every platform re-encodes what you upload, so you are giving them a master to compress rather than a finished file. Upload above what you need, because compressing an already compressed file is where visible artefacts come from.
Export at the resolution you recorded, not the one you publish at, where the platform allows it. Downscaling at the platform's end usually produces a better result than downscaling at yours.
Match the frame rate of the source. Converting frame rates introduces judder that looks like a quality problem and is not.
What you cannot fix
Being direct about this saves hours.
Blown highlights. No data. An enhancer will invent texture, and invented texture looks wrong on skin and sky.
Severe motion blur. The blur is in the recorded frame. Sharpening it produces halos rather than definition.
Out of focus footage. Focus is optical and cannot be recreated. Mild softness responds to sharpening; a genuinely missed focus does not.
Compression artefacts from the source. Blocking and banding are missing information. Denoising smooths the blocks into smears.
Audio recorded through a video call. Not a picture problem, but the same principle applies, and it is the most common version of this mistake. It is covered in the best tools to convert Zoom recordings to Shorts.
A wide two shot that will not crop to vertical. No enhancement adds frame that was never captured. The framing fix is in how to edit an interview video.
Every ranking guide on this subject arrives at the same conclusion, which is that quality is hard to improve after the fact and the real answer is getting it right at the shoot. The production sequence that supports that is in content production workflow, why editorial and editing should be two separate jobs.
Worked example: the same clip, two workflows
This is an invented example, not measured data.
A forty second interview clip is noisy in the shadows, slightly warm, and a little soft.
The first editor opens an enhancement preset, sharpens heavily to fix the softness, then notices the noise and applies strong denoise on top. The result has smeared blotches in the shadows and bright halos around the speaker's shoulders. It looks processed, which is worse than looking soft.
The second editor corrects white balance first, which removes the warm cast and makes the image read as sharper immediately. Then applies light denoise, then a small amount of sharpening, then exports above the publishing resolution. The clip is not transformed. It is clean, consistent with the rest of the sequence, and nobody watching thinks about the picture at all.
The second workflow used weaker settings in a different order and produced the better result.
Where Montage fits
Montage does not grade, denoise, sharpen or stabilise. It has no enhancement tools and it will not repair a picture problem, so nothing on this page is something Montage does for you.
What it does is take a long recording and return the moments worth publishing. Upload up to 20GB at 4K and it gives you 8 to 10 scored clip candidates rather than an unranked pile, each trimmable by editing transcript text, with branded captions, vertical reframing and exports to MP4 for social or XML, FCPXML and JSON for an editor.[1]
The relevant detail for this workflow is the source handling. Because it takes files up to 4K, the clips it produces are cut from your full resolution master rather than a downscaled proxy, which leaves the grading and cleanup work to happen on good source material afterwards. If a clip needs any of the treatment on this page, export the XML or FCPXML and do it on a timeline, as described in how XML export solves the producer and editor handoff problem.
Limitations and troubleshooting
The footage looks worse after enhancement. Almost always sharpening before denoising, or too much of both. Undo everything and start again with weaker settings in the correct order.
Skin looks like plastic. Over denoised. Reduce the strength and accept some grain, because grain reads as natural and smoothing does not.
There are bright outlines around the subject. Over sharpened. Reduce until the halos disappear, even if the image feels slightly soft.
The shot got noticeably tighter after stabilisation. Expected, since stabilisation crops. Use a lower setting, or accept the crop if the shake was worse.
The upload looks worse than the export. The platform re-encoded it. Export at a higher bitrate and at the source resolution so the platform compresses from a better master.
Colour shifts between clips in one sequence. They were corrected in isolation. Match the whole timeline against one reference clip rather than making each one look good alone.
Frequently asked questions
Can you improve video quality in post?
Partially. Noise, colour, shake and mild softness all respond to treatment. Blown highlights, missed focus, motion blur and compression artefacts are missing information and cannot be recovered.
Should you denoise or sharpen first?
Denoise first, always. Sharpening amplifies noise, so doing it first makes the noise stronger and the subsequent denoise smears it into blotches.
Does exporting at a higher bitrate improve quality?
It preserves what is already there rather than adding anything. A low bitrate export reintroduces blockiness into a clean image, so the bitrate matters most as a way of not losing the work you did.
Why does my video look worse after uploading?
Every platform re-encodes uploads. Give them a high bitrate file at the source resolution so their compression starts from a good master rather than an already compressed one.
What is the best way to fix a shaky video?
Stabilisation, applied before anything else and at the lowest setting that makes the shot watchable. It crops and resamples the frame, so stronger settings cost you resolution.
Does Montage improve video quality?
No. Montage produces clips from your recording and has no enhancement tools. Grading, denoising and stabilisation are timeline work, which is why the exports include XML and FCPXML.