How to Record a Video Podcast That Actually Clips Well
Equipment, setup and recording decisions for a video podcast, including the choices during recording that determine whether you get eight usable clips or two.
A practical guide to recording a video podcast, covering equipment, lighting, remote guests and publishing, plus the recording decisions that determine how much short form content the episode produces afterwards.
To record a video podcast you need a camera, an external microphone, controlled lighting, a quiet room and recording software that captures each participant locally. Audio quality matters more than camera quality, and recording locally rather than through the call is the single decision that protects the episode.
The useful question is not "what gear do I need?" It is "what will this recording be used for?" If the answer includes short form clips, and for most shows it does, then several decisions made during the recording determine whether the episode yields eight usable clips or two.
Why the recording stage decides your clip count
Most podcast advice treats recording and repurposing as separate jobs. Record the episode, then hand it to whoever makes the clips.
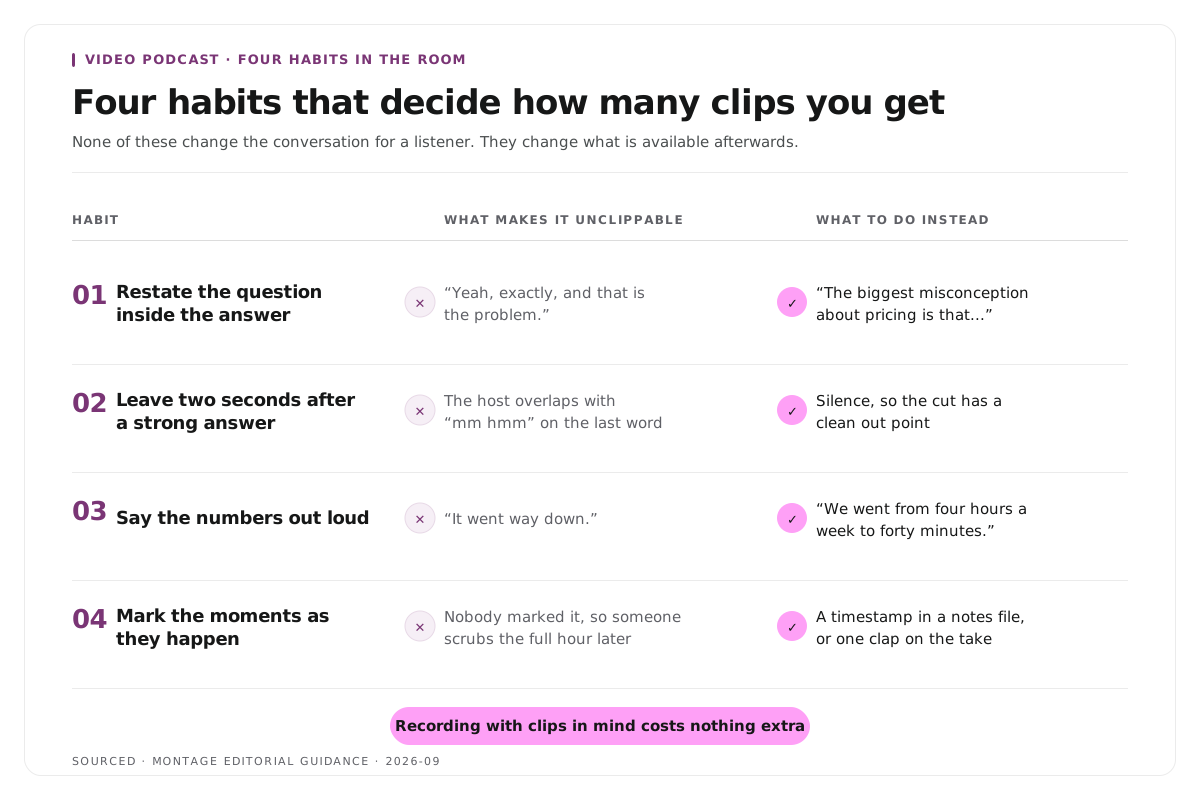
That sequence is why so many shows get so little out of an hour of footage. A moment only works as a standalone clip when it makes sense to a stranger, and whether that happens is decided by the host in the room, not by an editor afterwards. If your guest answers a question with "yeah, exactly, and that is the problem", the answer is unusable on its own no matter what tool processes it later.
Recording with clips in mind costs nothing extra. It changes about four habits, covered further down.
Step 1: sort the audio before anything else
Viewers forgive imperfect video. They leave over bad audio, and every ranking guide on this subject says the same thing because it is true.
Use an external microphone. The options in order of convenience: a USB podcast microphone for a simple desk setup, a lavalier for hands free recording, or an XLR microphone through an audio interface when the quality has to be high. A shotgun microphone suits directional capture on a wider set.
Control the room before you upgrade the microphone. Soft furnishings, closed windows and a rug will do more for a bare room than a more expensive microphone will. Reflections cannot be removed convincingly after the fact.
Record each participant on a separate track. Multi track recording means you can fix one person's audio without touching anyone else's, and it means a single failure does not cost you the episode.
Monitor with headphones while recording. Every participant, every time. Almost every ruined recording was audible in the first minute and nobody was listening.
If audio repair is already part of your process, the order of operations matters, and how to edit a podcast, the audio and video workflow covers what to fix when.
Step 2: choose the camera and frame
A modern smartphone recording 4K is a legitimate starting point. It out-resolves most webcams and costs nothing if you already own one. Mount it, do not hold it.
A webcam is fine for a solo desk show. A mirrorless or DSLR camera earns its cost once you want depth of field and interchangeable lenses, which matters more for a studio look than for clarity.
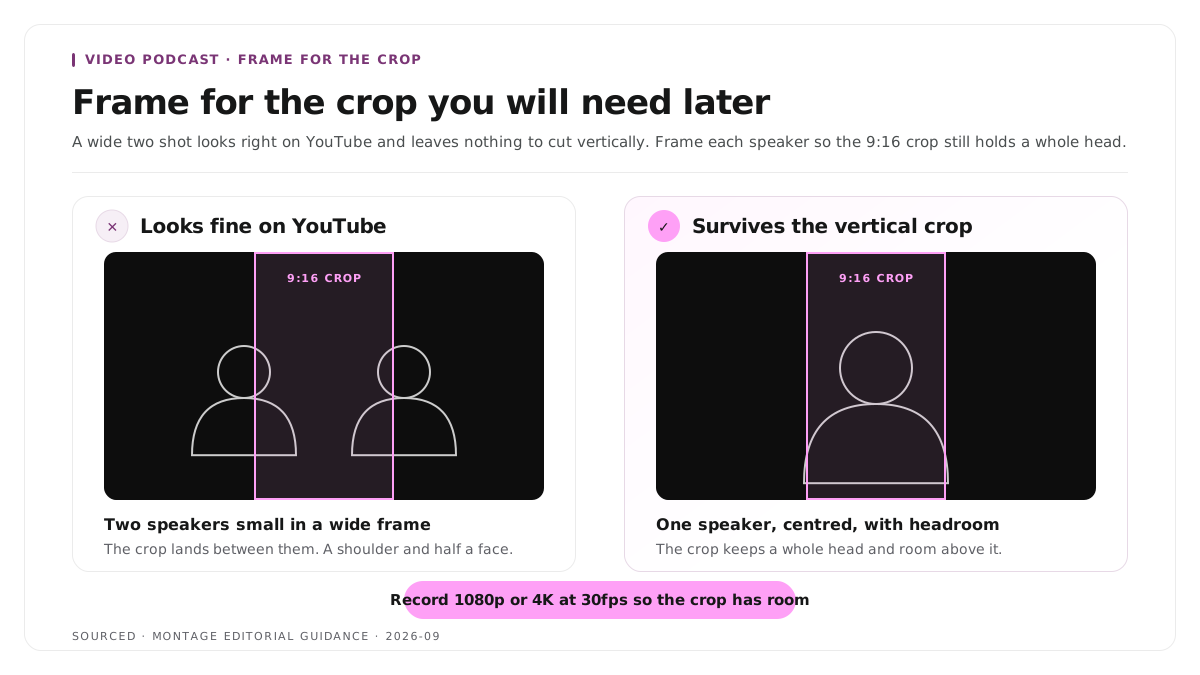
Frame for the crop you will need later. This is where most shows create problems for themselves. A wide two shot with both guests small in frame looks good on YouTube and is useless vertically, because cropping to 9:16 leaves you with a shoulder and half a face. Frame each speaker so a vertical crop around them still contains a whole head with room above it.
Record at 1080p or 4K at 30fps in MP4. Higher resolution gives the reframing step room to crop without softening the image.
Step 3: light it so the crop survives
A three point setup is the standard: a key light at roughly 45 degrees to the subject, a fill light opposite it to soften the shadow, and a backlight behind the subject to separate them from the wall.
You do not need three lights to start. One large soft key source in front of the speaker, positioned slightly off centre, beats an expensive kit used badly. What matters is that the light is soft, it comes from the front, and it does not change halfway through the episode.
Avoid a window behind the speaker. Daylight shifts over a two hour recording, and a backlit subject is unfixable in post.
Step 4: record remote guests without losing the episode
Remote is where recordings get lost, and the fix is consistent across every serious guide.
Record locally, not through the call. Software that captures full quality media on each participant's own machine and uploads afterwards protects you from bandwidth problems. Recording the video call itself means the compression and every dropout are baked into your master.
Ask guests to use a wired connection and close everything else. Most remote audio problems are bandwidth problems.
Do a thirty second test take before the real recording. Record it, play it back, check both faces and both voices. This catches roughly every equipment fault that would otherwise surface in the edit.
Keep a backup. A local phone recording of the room costs nothing and has rescued a lot of episodes.
Step 5: record four habits that multiply your clips
This is the part almost no guide covers, and it is where the hour of footage becomes eight clips instead of two.
- Have the guest restate the question inside the answer. "What is the biggest misconception about pricing?" should be answered with "the biggest misconception about pricing is that..." rather than "yeah, that people think it is simple." The first version stands alone. The second cannot be clipped without adding context on screen.
- Leave two seconds of silence after a strong answer. Do not overlap with "mm hmm" or a follow up. Overlapping audio is the most common reason a good moment cannot be cut cleanly.
- Say the numbers out loud. "We went from four hours a week to forty minutes" is a clip. "It went way down" is not.
- Mark the moments as they happen. A timestamp typed into a notes file, or simply saying "that was good" and clapping once, gives you a locatable marker. Whoever handles the clips will find it in seconds rather than scrubbing the full hour.
None of these change the conversation for a listener. They change what is available afterwards.
Step 6: publish
Publish the full episode where full episodes are watched, and the clips where clips are watched.
On YouTube, a podcast show is a playlist and each episode is a video inside it, which is different from how most creators assume it works. You create one in YouTube Studio by choosing Create, then New podcast, then entering the title, description, visibility and a square thumbnail. Doing this properly makes the show eligible for YouTube Music, for podcast badges on the watch and playlist pages, and for the podcast spotlight page.
Keep the playlist to full episodes only. Clips belong on your channel as Shorts, not inside the podcast playlist, because the playlist is meant to be consumed in order.
Worked example: a 62 minute interview, two setups
This is an invented example, not measured data.
Two shows record a 62 minute interview on the same subject.
The first frames both participants in one wide shot, records through the video call, and the host acknowledges every answer with an overlapping "right, yeah". The episode is good. When it reaches the clipping stage, the wide frame will not crop vertically, the overlapping audio means most answers cannot be cut cleanly, and four of the best answers open with an unexplained "that". It produces two usable clips.
The second frames each speaker separately, records locally, leaves a beat after each answer, and the guest restates questions inside answers because the host asked them to before recording. Same conversation, same length, same quality. It produces nine.
The difference was not the edit, the software or the budget. It was four decisions that cost nothing during the recording.
Where Montage fits
Montage does not record anything. It has no recorder, no remote guest capture and no role in your production setup. Everything above happens before Montage is involved.
What it does is the stage after. Upload the finished recording, up to 20GB at 4K, and it returns 8 to 10 scored candidate clips rather than an unranked pile, lets you refine each by editing transcript text, applies branded captions, reframes to vertical, and exports MP4 for social platforms or XML, FCPXML and JSON for an editor.
The editorial decisions stay with you. Montage does not decide which clip is worth publishing, does not write your titles and does not post anything. It also cannot repair a recording that was framed or captured badly, which is the whole reason this article is about the recording stage.
To see what a single episode yields, the podcast clip finder runs on one file. For the wider category, see the best podcast clip makers in 2026, and for the show page itself, Montage for podcasts.
Limitations and troubleshooting
The audio is fine but the room sounds hollow. That is reflection, not microphone quality. Add soft surfaces and move away from bare walls. No processing fixes a reverberant room convincingly.
The guest's video is soft while the audio is clean. The recording went through the call rather than locally. Switch to software that captures on each machine and uploads afterwards.
Every clip needs an on screen explainer to make sense. The answers are not self contained. Fix it at the question stage using the restating habit above, not in the edit.
A wide two shot will not crop to vertical. It will not, and no reframing tool solves it. Either frame speakers separately, use a split layout, or keep those moments horizontal. The multi speaker case is covered in how to clip multi speaker panel discussions without losing context.
The episode produced fewer clips than expected. That is usually normal rather than a failure. Realistic expectations are set out in how many clips you should make from one podcast episode.
Frequently asked questions
What equipment do you need to record a video podcast?
A camera, an external microphone, one controlled light source, headphones for every participant, and software that records each person locally. A 4K capable smartphone on a mount and a USB microphone is a legitimate starting setup.
Can you record a video podcast on your phone?
Yes. Modern phones record 4K and out-resolve most webcams. Mount the phone rather than holding it, light the subject from the front, and use an external microphone rather than the phone's built in one.
Is a video podcast better than an audio podcast?
It is not better, it is a different distribution bet. Video opens YouTube and short form platforms and produces clips you can distribute for months, at the cost of a harder production process. If you have no intention of making clips, the added effort is difficult to justify.
How do you record remote guests without losing quality?
Record locally on each participant's machine and upload afterwards rather than capturing the video call. Ask guests for a wired connection, run a thirty second test take, and keep a backup recording.
How do I mark clip-worthy moments while recording?
Keep a notes file open and type the timestamp when something lands, or say a short verbal marker and clap once so it appears as a spike in the waveform. Either way you save the person making clips from scrubbing the entire episode.
Does Montage record podcasts?
No. Montage processes finished recordings into clips. Recording, hosting and publishing are separate steps handled by other tools.